
No.1 Sign up+KYC
Sign up and KYC guides
1,APP Sign Up
Currently, BigONE supports two access to sign up: phone and Email;

If you can’t get code from email box, please check your trash box.
Use your personal phone number and email to sign up, to avoid unnecessary economic chaos, we suggest you set the password in the combined format of “characters+numbers+symbols” and the length of the password should be 8-20 characters.
Tips:you can enable the finger print lock, which will be much more convenient.
2,Security Level
Improve security level;
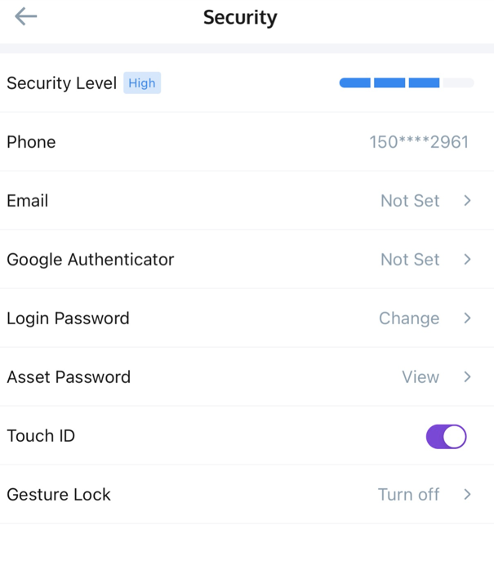
KYC+Security center settings;
In the security center, there is some security settings such as email, Google Authenticator, asset password and fingerprint.
Tips: We recommend you set all, one more step, one more security guard.
Each time you re-login, there will be text message, which reminds you that you are logging in BigONE, do not be panic, this is a security mechanism, to ensure you are the one who is operating the account.
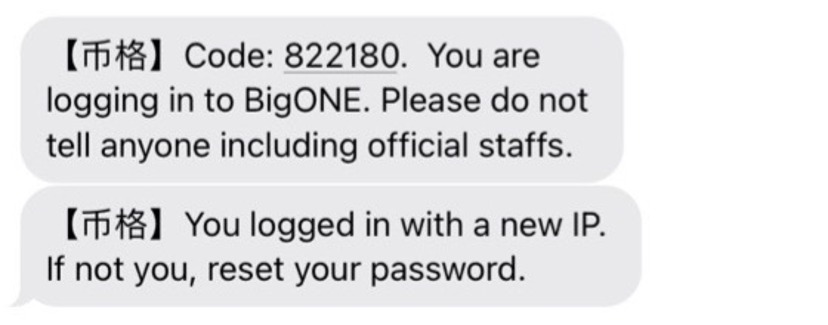
(Text message)

(Email message)
3,KYC
The steps about basic KYC:
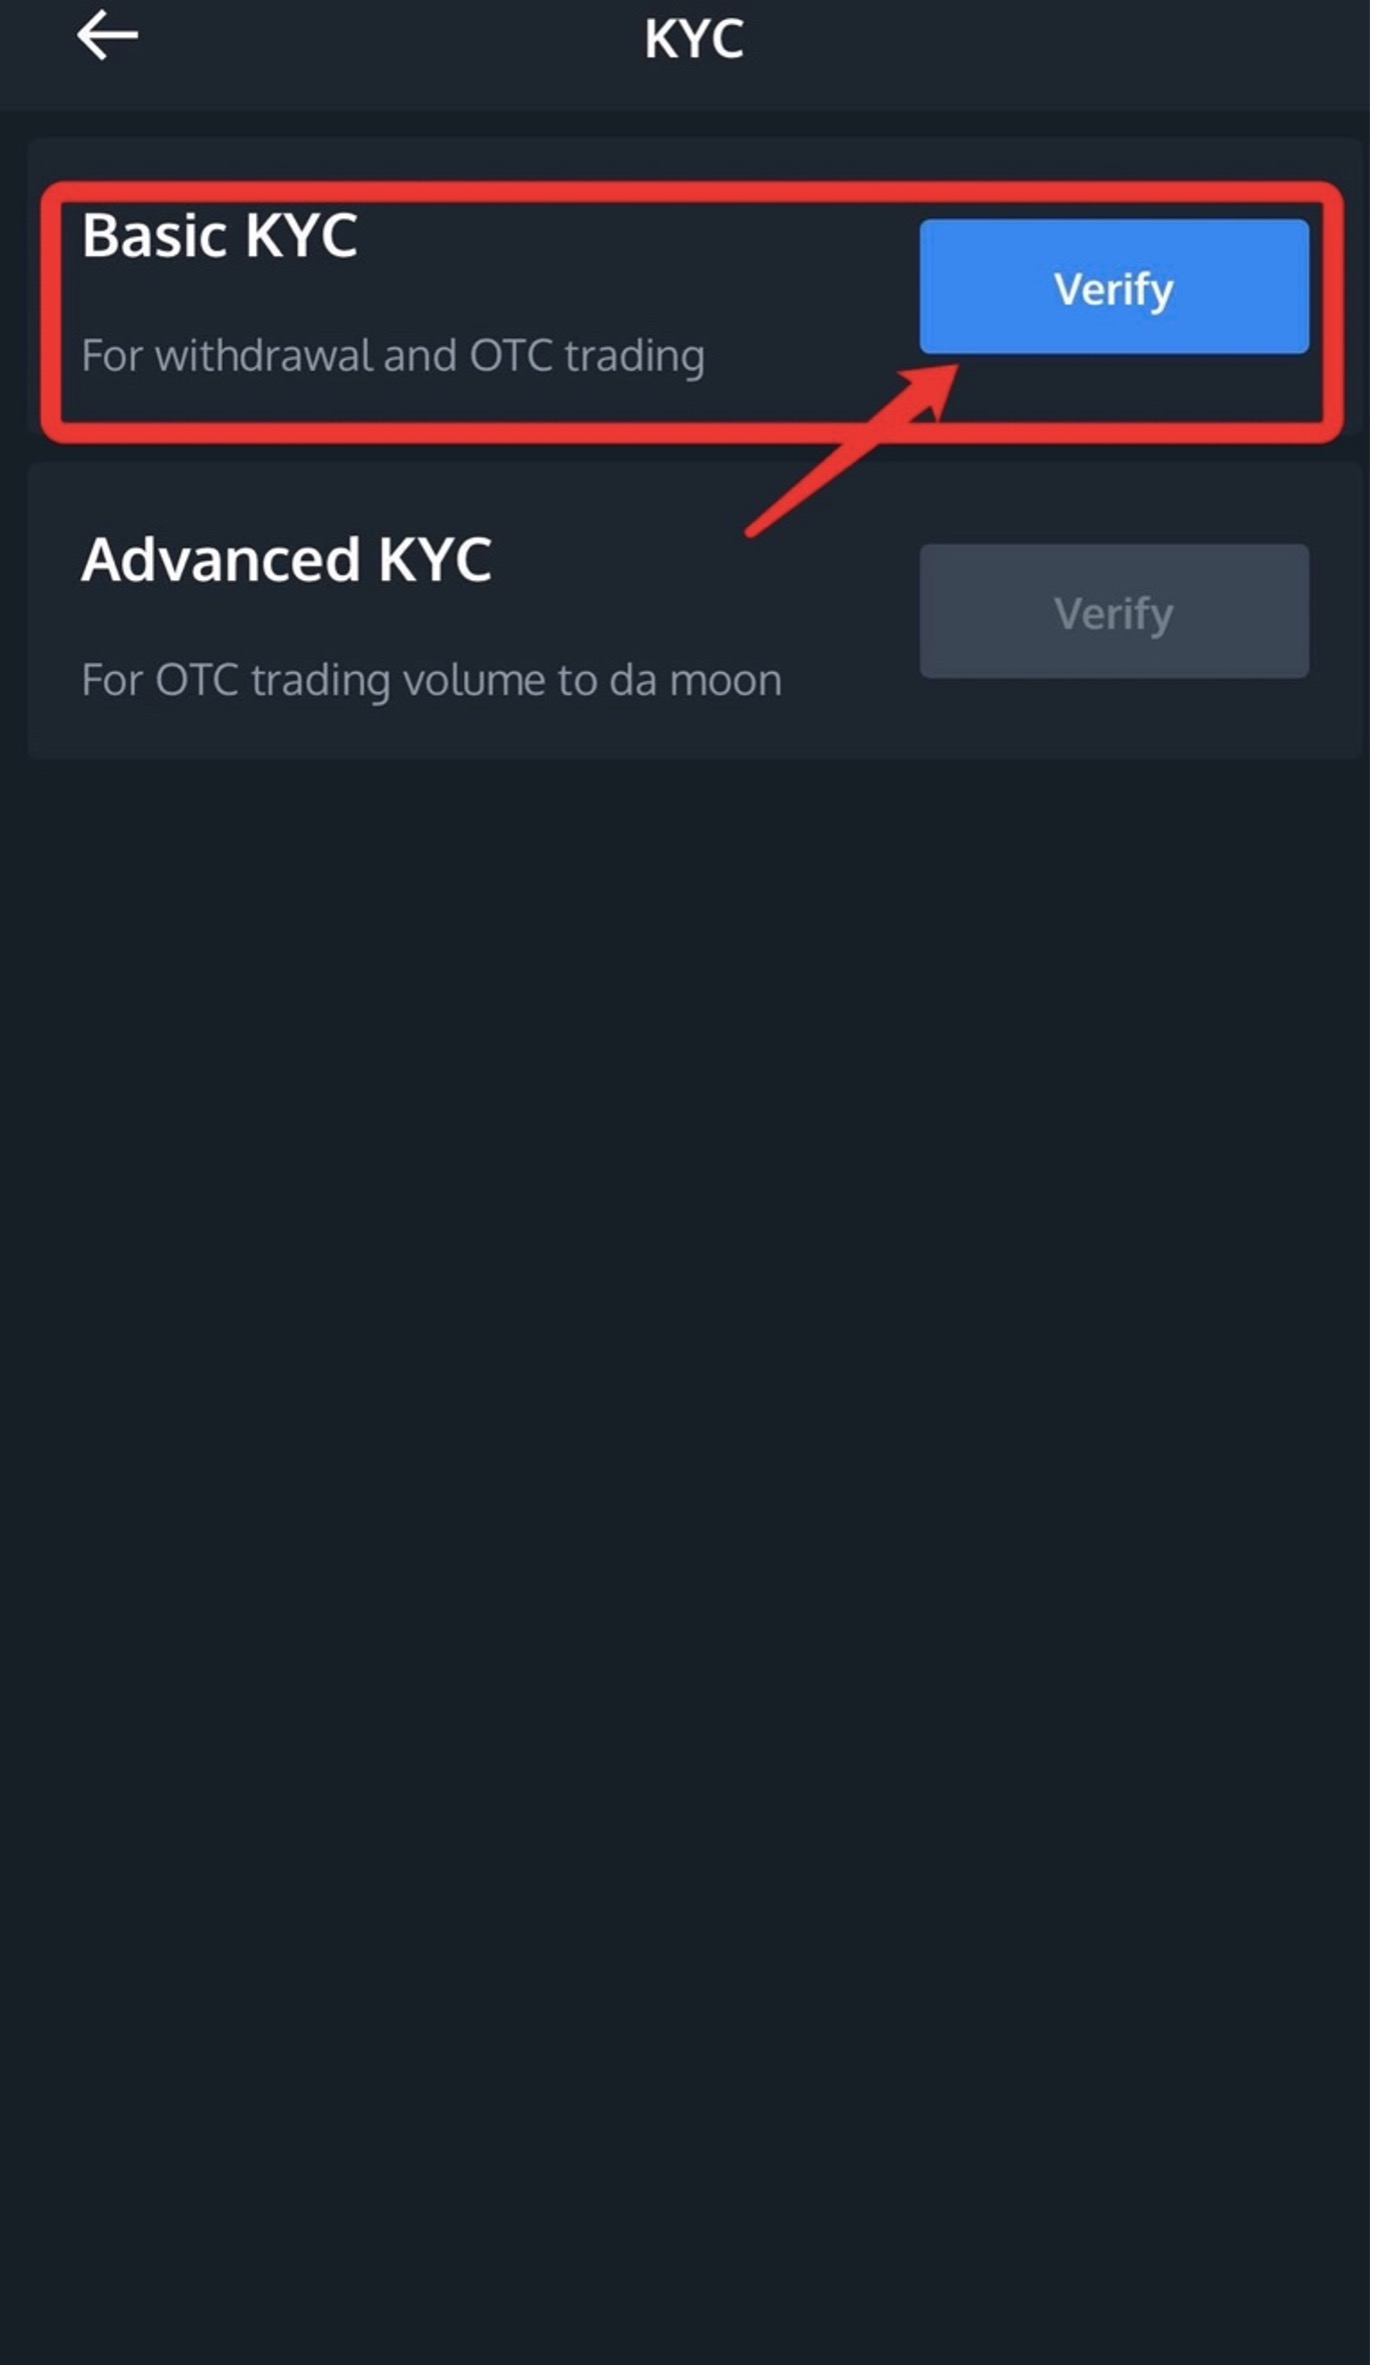
Tips: For those who have personal privacy concerns, don't worry at all. BigONE is very strict about personal information, and it is only used as asset proof.
(Ordinary users who complete the basic kyc can have a daily withdrawal limit of 50 BTC and an OTC transaction limit of 300 USDT for 24 hours, which can meet some small transaction requirements.)
4,Advanced KYC
If you want to have more transaction quotas and conduct faster and more convenient transactions, they can pass advanced KYC. Ordinary users can have a daily withdrawal limit of 100 BTC and an unlimited 24-hour OTC transaction limit.
Advanced certification requires more stringent certification integration, requiring portrait certification and uploading videos.

Advanced KYC:please note the size, format and upload in time;
The portrait authentication information must be consistent with the identity authentication information previously filled in, and once verified, it cannot be modified. Fill in truthfully. Otherwise, the digital assets may belong to others.

The next step is "live body" verification. Upload a video. You need to record a video to prove that you belong to this card again, and read a paragraph:
The content is“I,XXX, promise that the source of digital assets in BigONE is legal and willing to trade, willing to bear all legal consequences.”
Complete the record and upload the video, click “Next Step”, wait till it passes the review.
Tips: This review process may be a bit long, usually about 30 minutes, pay attention to wait patiently, if you fail to pass for a long time, you can contact online customer service to solve it.
No.2 Funds Transfer And Select Futures Coin
1,First, what is the futures?
Futures is a cryptocurrency derivative product. Users can choose to long (buy up) or short (buy short) by judging the ups and downs to obtain the benefits from the rise/fall of cryptocurrency prices.
In short, you need to go long or short to gain profit in actual operation.
2,Details Steps
2.1, Buy Cryptocurrency
Open BigONE APP you’ve downloaded,sign up and finish KYC, after you logged in, you need to transfer coins to your futures account.

Open the wallet at the bottom of the menu bar on the home page of the app。
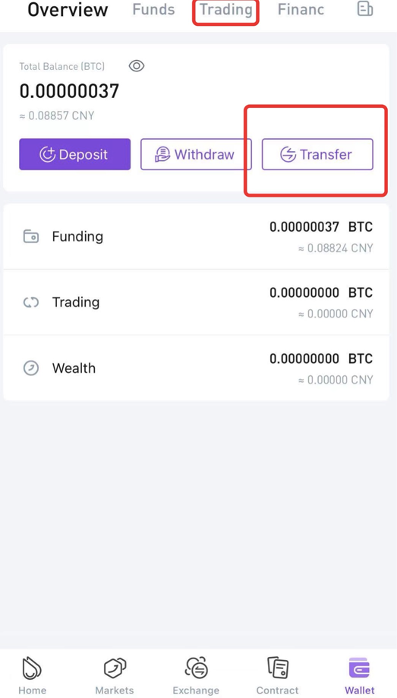
Transfer from Trading account
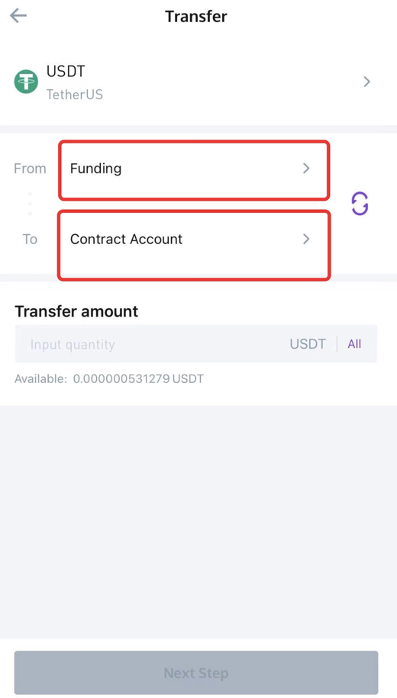
Transfer from Funding to Contract Account
To be noted here:
- If the funds you plan to transfer was transferred from other exchange, you also need to transfer from funding to contract account.
- If the funds you bought from BigONE directly, the coin you deposited is in the OTC account, then you need to transfer it from OTC account to funding account, then transfer from funding account to contract account.
Here the funding account equals to a transit center.
2.2,Select Contract Coin
Click the button of contract on the APP homepage and enter the page of contract.
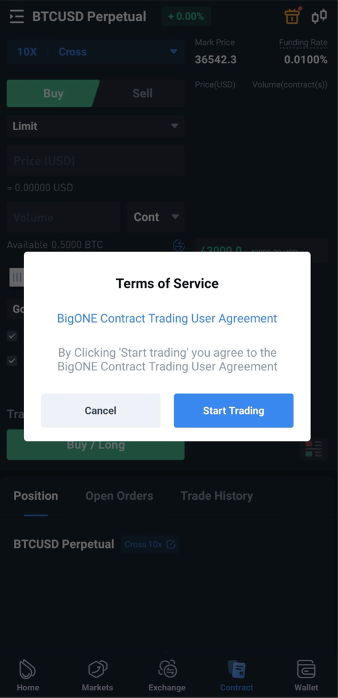
There will be”BigONE Contract Trading User Agreement” tips,after reading it, click ”Start Trading”.
Click and open the button at the left top corner, then you will see the contract coins selection template
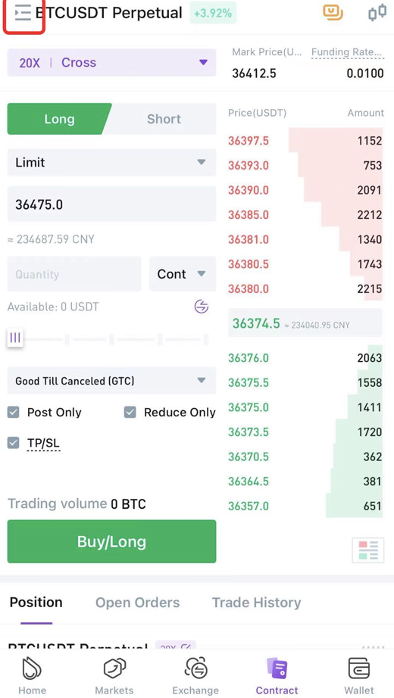
The template is as below:
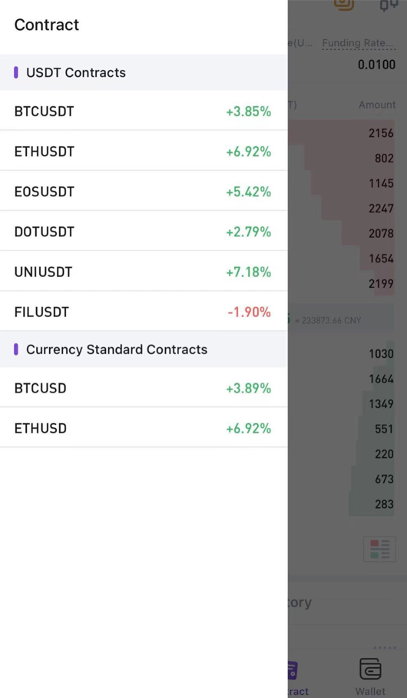
Because of its versatility, USDT has trading pairs with many currencies, so when buying a specific contract, you can directly use USDT to buy.
For ETH and BTC to participate in contract transactions, you need to use ETH/BTC to buy.
No.3 Recognize Futures Interface
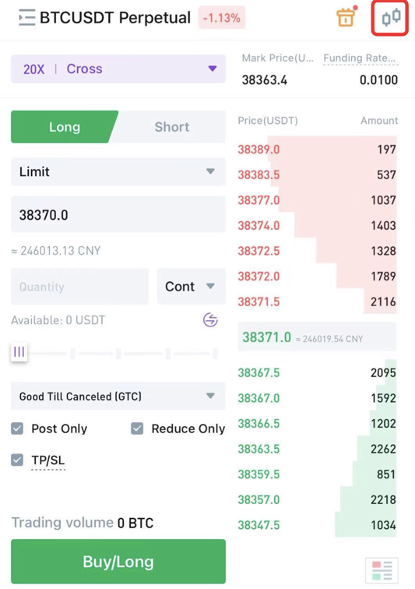
1,Recognize Futures Interface
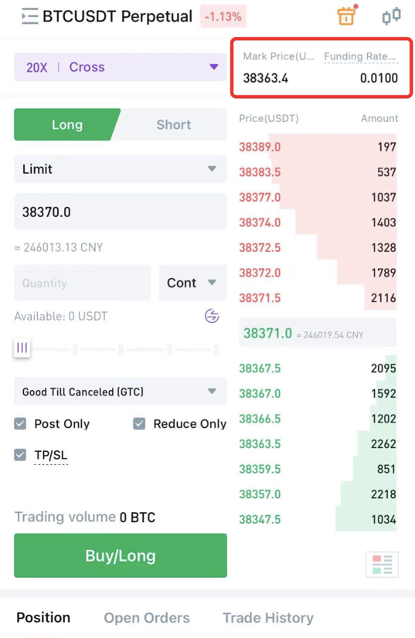
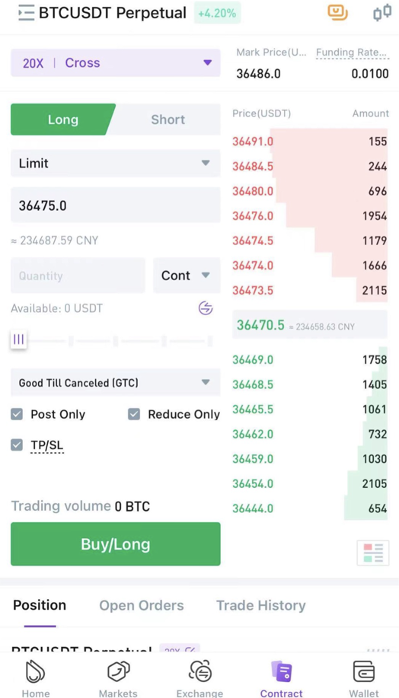
There are 2 sections on the futures interface, which are mark price and funding rate.
Funding rate:to ensure the transaction price of the perpetual futures follows the spot price to balance long and short.
Mark price:which is also called as price marking, it is calculated with the formula based on spot index and funding rate, profit, loss and liquidation will all be calculated by mark price, to avoid market manipulation and price instability.
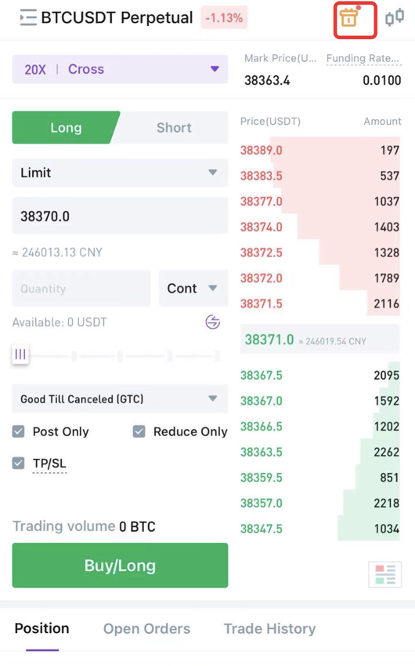
At the right top corner, there is a gift symbol;, which means Futures Bonus, if you want try to trade futures without your own funds, please click the right top corner gift symbol to claim.

If you meet more conditions, you can unlock more bonuses. All the bonuses you can receive is a lot of money.
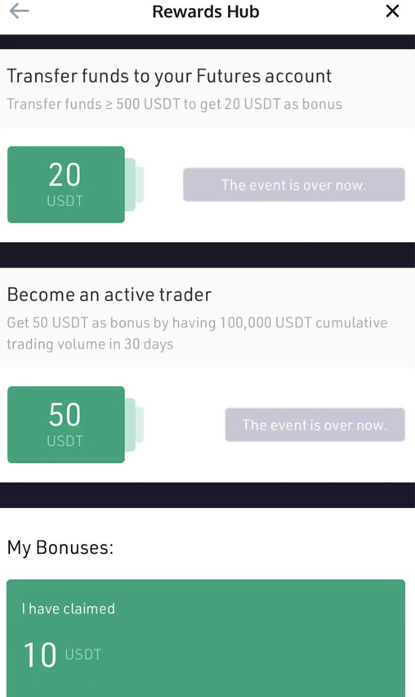
The bonuses will be credited to your BigONE futures account, it cannot be transferred or withdrawn. The profit part can be withdrawn, the bonuses can be used to deduct account losses, transaction fees and funding rates。
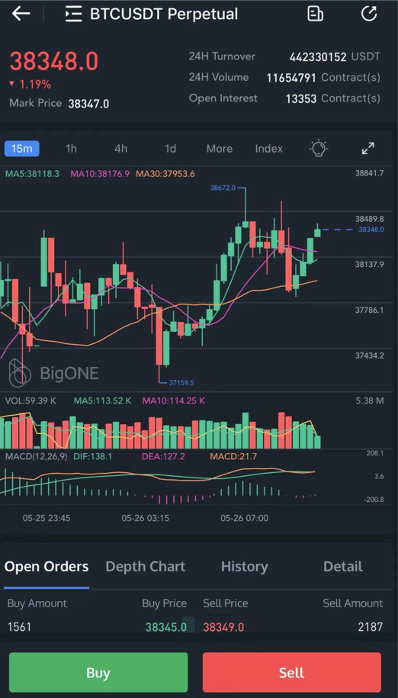
Next is the icon next to the bonus, which always pays attention to the trend of the futures market. It is the price trend chart of the currency on the main interface, which is convenient for users to view at any time. At the same time, it will also display information such as pending orders and transactions.
The interface is like this after you click it:
Turn back to the futures interface.
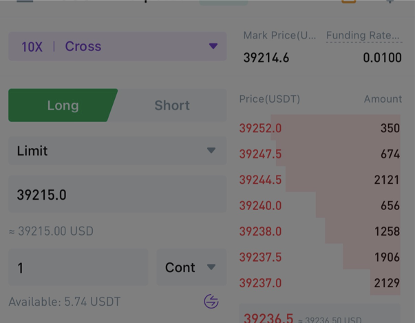
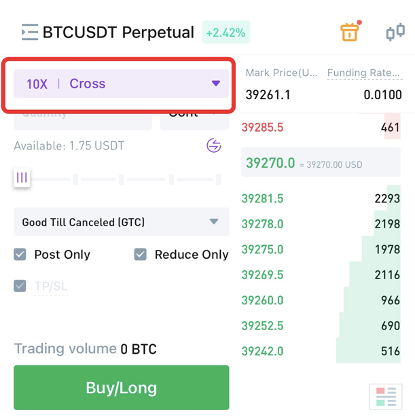
In the main visual area, the interface for buying and selling contracts is displayed.
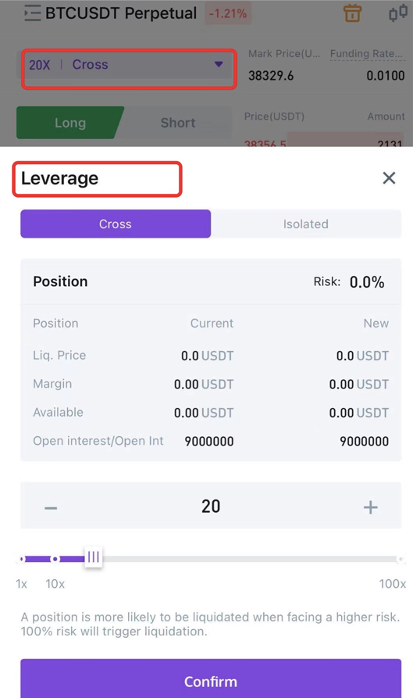
On the left is the console for buying and selling (corresponding to long or short), on the right is the handicap, and on the right is the number of buying and selling of other users in the futures market, which will change in real time. The movable slider on the left represents multiples. Different multiples represent the need for different amounts of reserves.
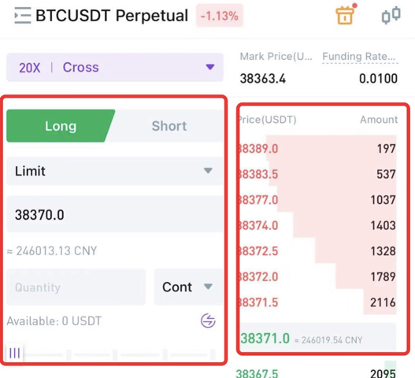
Note:The unit amount of the futures is “Cont”, you can check the detailed value of each cont is displayed on the interface, how many conts could be equals to how many pieces to buy/sell. If you still cannot understand, you can click “currency” unit, which will be easy to trade and understand.
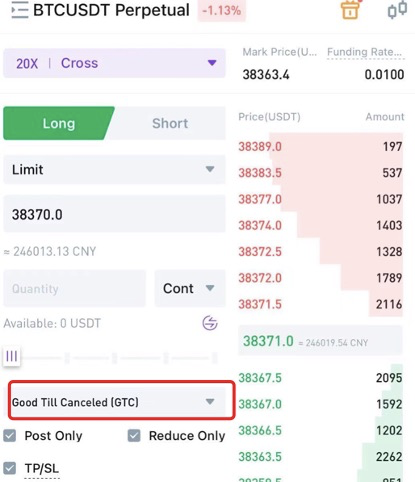
Then you can choose to enter a certain price to enter, choose whether it is always valid until the order (direct pending orders and other transactions will appear in the bottom trading history order), or immediately or cancel (referring to immediate transaction and cancellation of the remaining), or all transactions or cancel (wait until all is matched).
Event you could check detailed information from the cross and leverage part.
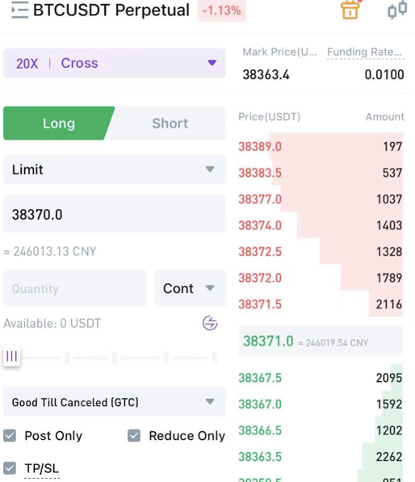
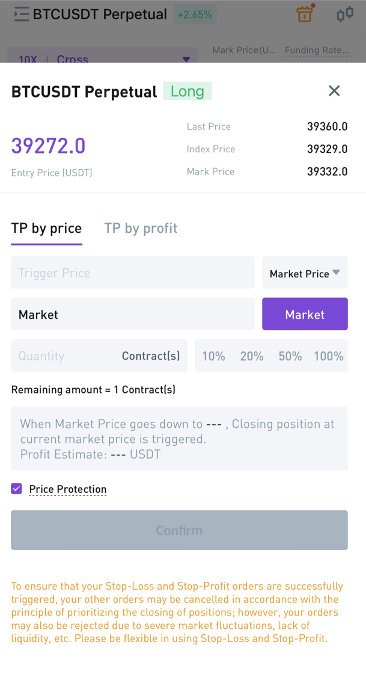
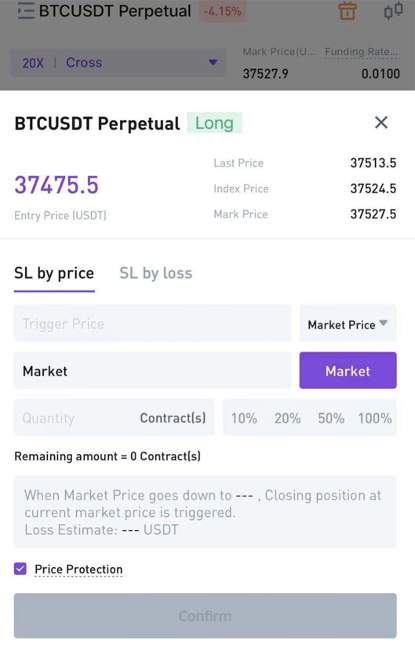
Next, let’s focus on 3 features “TP/SL”,“post only”and“reduce only”.
TP/SL,is setting the trigger price, you can set it up when you open position, it will triggered when the market price reaches the price.
But here the setting is simple.
Now BigONE has made the industry's first exclusive optimization plan for stop-profit and stop-loss, making stop-profit and stop-loss simpler and smarter to meet a variety of needs.
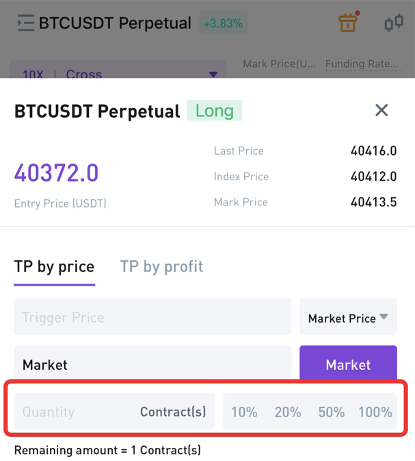
After the position is opened, the stop-profit and stop-loss buttons are set separately in the position, and the stop-profit function can be used to take profit by price and profit by return.
And in terms of the trigger conditions of the take profit, it is also divided into separate settings by market price, mark price, and index price, market price.

Even the position percentage of take-profit and stop-loss can also be set, setting some positions to apply the take-profit and stop-loss function.
And it is the same as stop-loss.
But Reduce Only generally used in situations where investors want to avoid an order being recognized as an open position. For example, when setting stop-loss and take-profit orders, investors can add the reduce-only attribute to the order to prevent the order from being submitted as an open position. Reduce-only orders should only be used to allow investors to close positions, not to open positions.
Post Only, is actually a price limit order. The main difference between the two is: once an investor placing an order in a post only order submits an order, the server will first make a judgment to ensure that it will never become a taker (take an order) and will always be a maker (pending order).
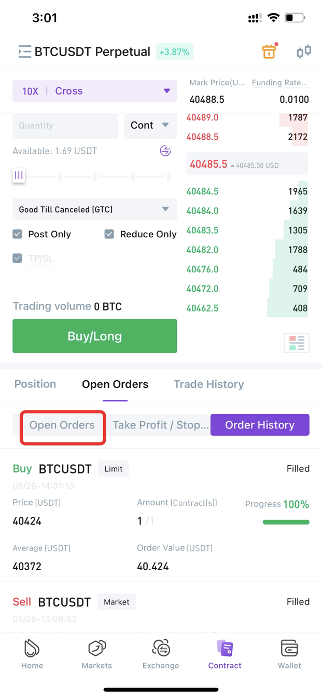
At the bottom of the futures interface, it is Position, Open Orders and Trade History.
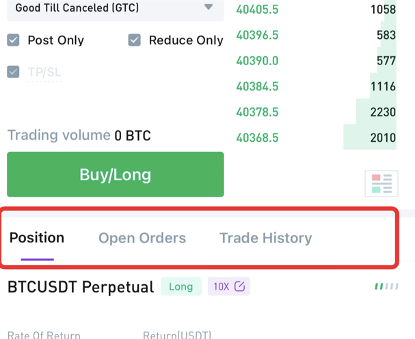
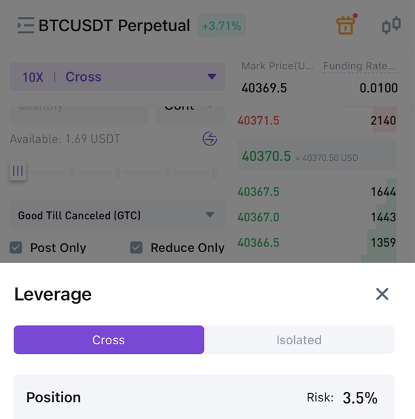
Let's talk about the position first. You can see how much leverage is in the position, whether it is a cross position or isolated position, how much margin is, and the opening price... etc.
Note:the more the position risk value is, the closer to liquidation, when it reaches 100%, your position will be liquidated.
Here it refers to several concepts:
Margin: In the futures market, traders only need to pay a small amount of funds at a certain ratio according to the contract price as a financial guarantee for the performance of the futures, and then they can participate in the sale of the futures. This kind of funds is the virtual futures margin. Margin can be divided into two: cross position margin and isolated position margin.
Cross:In the cross position mode, all available balance in the contract account will be used as position margin to avoid forced liquidation. Any other positions that have realized profits can help increase margin on losing positions.
Isolated: In the isolated position mode, the margin locked in the initial order is the maximum loss of this position. When a position is forced to close, any of your available balance will not be used to increase the margin of this position.
Close position:Means investor clear or reduce position, and stop holding futures.
Liquidation:means forced liquidation, when the margin rate is lower than the maintenance margin rate + liquidation fee rate, the forced liquidation is triggered
If you want to share your own "records" with others, click the button on the far right of the position.

The automatic position reducing indicator is a newly added function. The more lights are on, the more dangerous it represents. At this time, you can choose to increase the principal (in cross position mode) or stop loss in time.
Open orders are divided into current open orders and order history, here you can judge and select a price to open position or buy bottom.
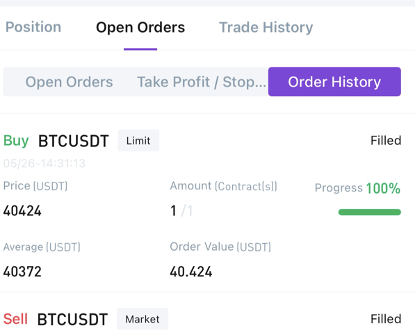
For the order history, it is the details about the futures you traded previously.
No.4 Practical Demonstration
1,Start the practical demonstration
Open position
What is open position? As long as you place order to buy or see, that is called “open position”. The detailed steps are as follows:
Take the ETH/USDT cross futures trading pair as an example.
Select the futures type you want to buy, choose long or short direction, conts, and confir.
For example: if you long BTC, buy a cont, select buy/long
There will be a page pop up, confirm.
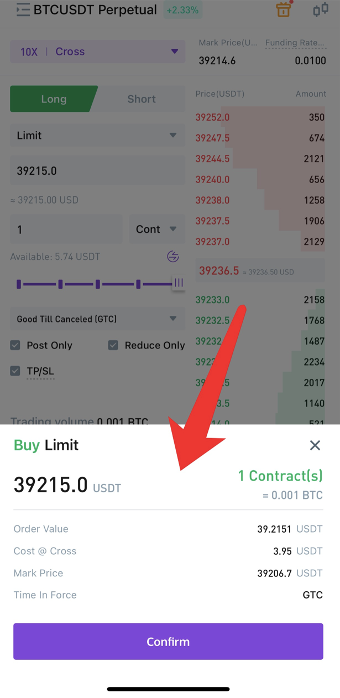
Then, as we mentioned in the previous article, we can check this order from Position.
If the trigger price has not been reached, check Open Orders and you can also see the order you just placed.
At this place below:
In the position, you can also switch between cross and isolated, (note: change the position isolated/cross, the liquidation price will change accordingly) and adjust the risk limit.
If you follows these steps, basically it is done the whole process.
2,How to judge whether you are profitable?
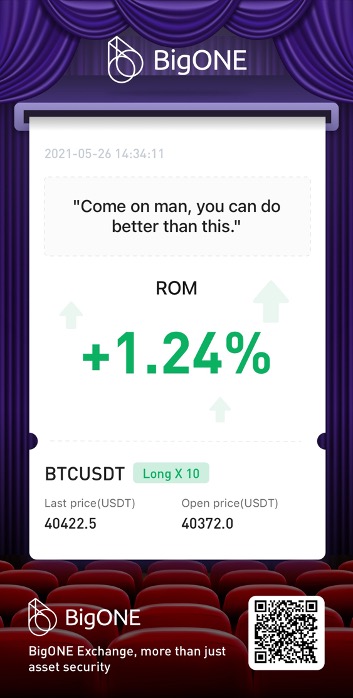
You can check the position at the bottom of your futures interface, it shows you the profit rate and profits you earn.
Or click the share symbol beside return rate, it will generate a poster, click, and share the futures “record” with your friends.
Like this:
Then we enter the result-oriented
If the market trend of the purchased futures currency is seriously contrary to your prediction, you have three options.
The first strategy, you can choose to close the position at any time
In the position column at the bottom of the contract interface, select market price closing/limit price closing.
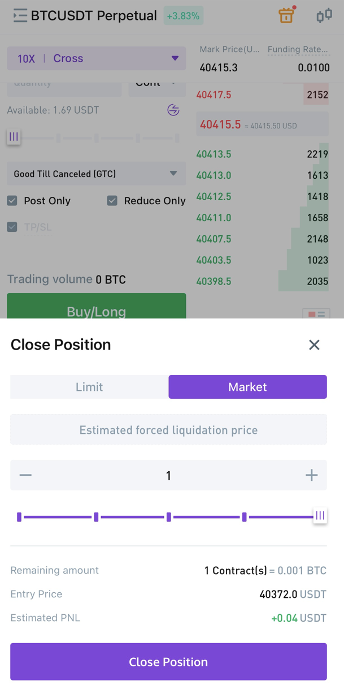
You can quickly close positions at market prices to reduce losses. Here you can choose the number freely, and you can also partially close the position.
Some users want to setting limit price closing, can also switch the settings on the page.
After all, it is very easy and free to operate.
The second strategy, you can take profit and stop loss, the operation interface is here
The third strategy, if you do not take any "remedial" measures, when the liquidation price reaches, system will automatically liquidate your position and there will be a text message prompting the liquidation to tell you the details.
If you open a futures with long, and you judge that the price will rise up, that is basically the same with the above 3 strategies.
Except trade with market price, you can also set the order by your own.
You can set a price, conts, direction long/short, then confirm the order.
If the transaction is not completed, the order will be always on the Open Orders-Open Orders page.
If the transaction is completed, you can check the order on the Trade History record.
3,How to withdraw after the transaction is completed?
As mentioned before, proceed in the opposite direction, transfer from the contract account back to the funding account, then transfer from the funding account back to the OTC account, and then sell from the OTC.

If you do not plan to sell out directly (withdraw), you want to transfer to other trading platform, then you need to transfer from contract account to funding account, then transfer from funding account to the receive address of other trading platform.
These are all the futures trading guide,
if you have any questions, please contact customer support at any time(Telegram: @ jennie12345678)
Comments
0 comments
Article is closed for comments.